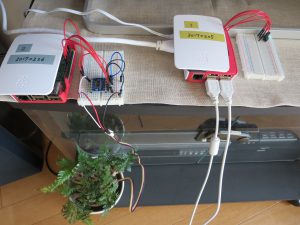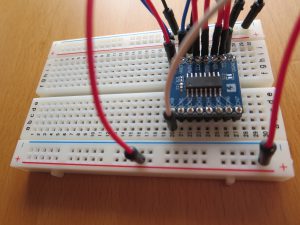
水分センサのpythonコード(2ファイル)をそのまま。。。
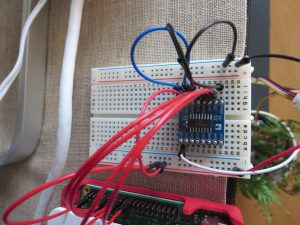
①水分センサの測定用、ADCを介したpython
(adafruit_mcp3008_3.py)
————————————-
#!/usr/bin/env python
# -*- coding: utf-8 -*
# Written by Limor “Ladyada” Fried for Adafruit Industries, (c) 2015
# This code is released into the public domain
# import module
import time
import os
import RPi.GPIO as GPIO
import random # モジュールのインポート
# ドライバをimport
import mysql.connector
if __name__ == ‘__main__’:
# データベースに接続
# localhost access ok!!!!!
connect = mysql.connector.connect(user=’root’, password=’root’, host=’localhost’, database=’moisture_sensor’, charset=’utf8′)
cursor = connect.cursor()
# temp=random.randint(0, 50)
# humid=random.randint(0, 100)
GPIO.setmode(GPIO.BCM)
DEBUG = 1
# read SPI data from MCP3008 chip, 8 possible adc’s (0 thru 7)
def readadc(adcnum, clockpin, mosipin, misopin, cspin):
if ((adcnum > 7) or (adcnum < 0)):
return -1
GPIO.output(cspin, True)
GPIO.output(clockpin, False) # start clock low
GPIO.output(cspin, False) # bring CS low
commandout = adcnum
commandout |= 0x18 # start bit + single-ended bit
commandout <<= 3 # we only need to send 5 bits here
for i in range(5):
if (commandout & 0x80):
GPIO.output(mosipin, True)
else:
GPIO.output(mosipin, False)
commandout <<= 1
GPIO.output(clockpin, True)
GPIO.output(clockpin, False)
adcout = 0
# read in one empty bit, one null bit and 10 ADC bits
for i in range(12):
GPIO.output(clockpin, True)
GPIO.output(clockpin, False)
adcout <<= 1
if (GPIO.input(misopin)):
adcout |= 0x1
GPIO.output(cspin, True)
adcout >>= 1 # first bit is ‘null’ so drop it
return adcout
# change these as desired – they’re the pins connected from the
# SPI port on the ADC to the Cobbler
SPICLK = 18
SPIMISO = 23
SPIMOSI = 24
SPICS = 25
# set up the SPI interface pins
GPIO.setup(SPIMOSI, GPIO.OUT)
GPIO.setup(SPIMISO, GPIO.IN)
GPIO.setup(SPICLK, GPIO.OUT)
GPIO.setup(SPICS, GPIO.OUT)
# 10k trim pot connected to adc #0
potentiometer_adc = 0;
last_read = 0 # this keeps track of the last potentiometer value
tolerance = 5 # to keep from being jittery we’ll only change
# volume when the pot has moved more than 5 ‘counts’
n=1
#while n<=1:
if (n == 1):
# we’ll assume that the pot didn’t move
trim_pot_changed = False
# read the analog pin
trim_pot = readadc(potentiometer_adc, SPICLK, SPIMOSI, SPIMISO, SPICS)
# how much has it changed since the last read?
pot_adjust = abs(trim_pot – last_read)
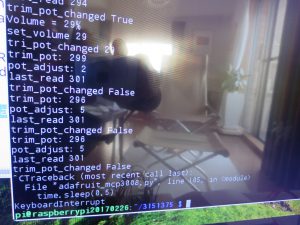
if DEBUG:
print “trim_pot:”, trim_pot
print “pot_adjust:”, pot_adjust
print “last_read”, last_read
if ( pot_adjust > tolerance ):
trim_pot_changed = True
if DEBUG:
print “trim_pot_changed”, trim_pot_changed
if ( trim_pot_changed ):
set_volume = trim_pot / 10.24 # convert 10bit adc0 (0-1024) trim pot read into 0-100 volume level
set_volume = round(set_volume) # round out decimal value
set_volume = int(set_volume) # cast volume as integer
print ‘Volume = {volume}%’ .format(volume = set_volume)
set_vol_cmd = ‘sudo amixer cset numid=1 — {volume}% > /dev/null’ .format(volume = set_volume)
os.system(set_vol_cmd) # set volume
if DEBUG:
print “set_volume”, set_volume
print “tri_pot_changed”, set_volume
# save the potentiometer reading for the next loop
last_read = trim_pot
# insert
cursor.execute(‘insert into ms_tbl(time_stamp,adc,read_adc,volts,comment,trim_pot,pot_adjust,last_read,trim_pot_changed,set_volume) values (now(),%s ,%s, %s, %s, %s, %s, %s, %s, %s)’, (trim_pot,set_volume,’taniku_pot2017/03/25′,’comment2017/03/25′,trim_pot,pot_adjust,last_read,trim_pot_changed,set_volume))
# Delete
cursor.execute(‘DELETE FROM ms_tbl ORDER BY Num ASC LIMIT 1’)
# autocommitではないので、明示的にコミットする
connect.commit()
# データベースから切断
cursor.close()
connect.close()
# hang out and do nothing for a half second
# time.sleep(0.10)
②RaspiのデータをさくらVPSへ転送、pythonコード
(20170323_snd_skr_ms1.py)
————————————-
#!/usr/bin/env python
# -*- coding: utf-8 -*-
# import module
import os
import random # モジュールのインポート
# ドライバをimport
import mysql.connector
if __name__ == ‘__main__’:
# データベースに接続
# localhost access ok!!!!!
connect = mysql.connector.connect(user=’root’, password=’root’, host=’localhost’, database=’moisture_sensor’, charset=’utf8′)
cursor = connect.cursor()
# select
cursor.execute(‘select * from ms_tbl order by Num DESC limit 1′)
rows = cursor.fetchall()
# 出力
for i in rows:
print(“—send below data to sakravps success !!—-“)
print(i[0])
print(i[1])
print(i[2])
print(i[3])
print(i[4])
print(i[5])
print(i[6])
print(i[7])
print(i[8])
print(i[9])
print(i[10])
# sakuravps access
connect = mysql.connector.connect(user=’raspai’, password=’Aa123456′, host=’160.16.50.187′, database=’20170301_moisture_sensor’, charset=’utf8′)
cursor = connect.cursor()
# insert
cursor.execute(‘insert into ms_tbl(time_stamp,adc,read_adc,volts,comment,trim_pot,pot_adjust,last_read,trim_pot_changed,set_volume) values (%s, %s, %s, %s, %s, %s, %s, %s ,%s, %s)’, (i[1],i[2],i[3],i[4],i[5],i[6],i[7],i[8],i[9],i[10]))
# cursor.execute(‘insert into ms_tbl(time_stamp,adc,read_adc,volts,comment) values (%s, %s, %s, %s, %s)’, (i[1],i[2],i[3],i[4],i[5]))
# Delete
cursor.execute(‘DELETE FROM ms_tbl ORDER BY Num ASC LIMIT 1’)
# autocommitではないので、明示的にコミットする
connect.commit()
# データベースから切断
cursor.close()
connect.close()
以上