IoTチームのために、何かお役にたてば、、とブログだけ。。
まず、Python2の復習。
エスケープシーケンスを使うのでメモ掲載、
改行とか。表は下記参考に。
(figure1)

で、さて、まずは、Deviceの登録をします。
マニュアルによると、「Create」から。。。。。
Linuxでのコマンドは。下記。
ID、Passをそのまま載せているけど悪さしないでね>見ている人
デバイス名は「HelloWorldDevice2017/01/24」にとりあえず。
==================
(#1)
curl -v -u yoshihara20161226:A******6 \
-H ‘Accept: application/vnd.com.nsn.cumulocity.managedObject+json; charset=UTF-8; ver=0.9’ \
-H ‘Content-type: application/vnd.com.nsn.cumulocity.managedObject+json; charset=UTF-8; ver=0.9’ \
-X POST \
-d ‘{“c8y_IsDevice”:{},”name”:”HelloWorldDevice2017/01/24“}’ \
https://iot05.cumulocity.com/inventory/managedObjects
さて、入ってみましょう!
https://iot05.cumulocity.com/

右上メニューからDeveice Managementをクリック
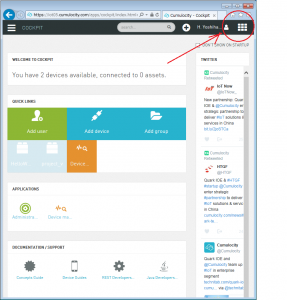
(figure 2)
connectionができれば、簡単に「dvice登録」されました!

ALLDeveicesをみると、、「HelloWorldDevice2017/01/24」が登録されてます。
で、デバイスをクリックすると、、
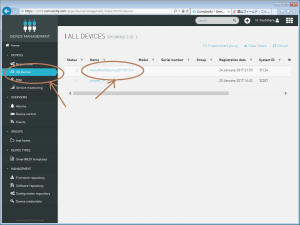
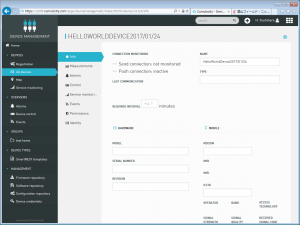
デバイスのInfo画面がでます。。。
右下に下がって、そこにデバイスIDが割振りされます。
これを使って、RESTで送ると、飲み込んでくれる仕組みです。
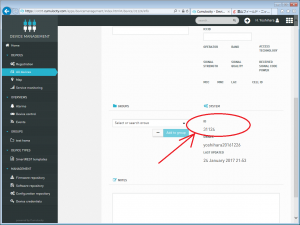
さて、次にwebでdeviceのIDを「デバイスID」に設定して、
pythonファイルを作成します。。。。
==================
ID=31124 <====これが私のデバイスのID!!!
==================
#!/usr/bin/python
# coding: UTF-8
import os
import random # モジュールのインポート
from datetime import datetime
temp=random.randint(0, 100)
#dt=datetime.now()
dt_iso=datetime.now().isoformat()
print “————————-\\”
print temp
print dt_iso
print “————————-\\”
print “curl -v -u yoshihara20161226:A******6 “
print “-H ‘Accept: application/vnd.com.nsn.cumulocity.measurement+json; charset=UTF-8; ver=0.9’ “
print “-H ‘Content-type: application/vnd.com.nsn.cumulocity.measurement+json; charset=UTF-8; ver=0.9’ “
print “-X POST “
print “-d ‘{\”c8y_TemperatureMeasurement\”:{\”T\”:{\”value\”:”
print str(temp)+ “”
print “,\”unit\”:\”C\”}},\”time\”:\””
print str(dt_iso) +””
print “\”,\”source\”:{\”id\”:\”31124\”},\”type\”:\”c8y_PTCMeasurement\”}’ “
print “https://iot05.cumulocity.com/measurement/measurements/”
print “————————–\\”
cmd1 = “curl -v -u yoshihara20161226:A******6 “
cmd2 = “-H ‘Accept: application/vnd.com.nsn.cumulocity.measurement+json; charset=UTF-8; ver=0.9’ “
cmd3 = “-H ‘Content-type: application/vnd.com.nsn.cumulocity.measurement+json; charset=UTF-8; ver=0.9’ “
cmd4 = “-X POST “
cmd5 = “-d ‘{\”c8y_TemperatureMeasurement\”:{\”T\”:{\”value\”:”
cmd6 = str(temp) + “”
cmd7 = “,\”unit\”:\”C\”}},\”time\”:\””
cmd8 = str(dt_iso) +””
cmd9 = “\”,\”source\”:{\”id\”:\”31124\”},\”type\”:\”c8y_PTCMeasurement\”}’ “
cmd10 = “https://iot05.cumulocity.com/measurement/measurements/”
os.system(cmd1+cmd2+cmd3+cmd4+cmd5+cmd6+cmd7+cmd8+cmd9+cmd10)
コマンドファイルができたら、送ってみます!!Pythonで実行!!
==================
pi@raspberrypi-20161228:~ $ python 20170124_pytocum1
==================
下記、表示結果のPrint。うまく行ってるみたいね!!!
————————-\
96
2017-01-24T21:43:49.023410
————————-\
curl -v -u yoshihara20161226:Aa123456
-H ‘Accept: application/vnd.com.nsn.cumulocity.measurement+json; charset=UTF-8; ver=0.9’
-H ‘Content-type: application/vnd.com.nsn.cumulocity.measurement+json; charset=UTF-8; ver=0.9’
-X POST
-d ‘{“c8y_TemperatureMeasurement”:{“T”:{“value”:
96
,”unit”:”C”}},”time”:”
2017-01-24T21:43:49.023410
“,”source”:{“id”:”31124″},”type”:”c8y_PTCMeasurement”}’
https://iot05.cumulocity.com/measurement/measurements/
————————–\
* Hostname was NOT found in DNS cache
* Trying 52.28.26.32…
* Connected to iot05.cumulocity.com (52.28.26.32) port 443 (#0)
* successfully set certificate verify locations:
* CAfile: none
CApath: /etc/ssl/certs
* SSLv3, TLS handshake, Client hello (1):
* SSLv3, TLS handshake, Server hello (2):
* SSLv3, TLS handshake, CERT (11):
* SSLv3, TLS handshake, Server key exchange (12):
* SSLv3, TLS handshake, Server finished (14):
* SSLv3, TLS handshake, Client key exchange (16):
* SSLv3, TLS change cipher, Client hello (1):
* SSLv3, TLS handshake, Finished (20):
* SSLv3, TLS change cipher, Client hello (1):
* SSLv3, TLS handshake, Finished (20):
* SSL connection using TLSv1.2 / ECDHE-RSA-AES256-GCM-SHA384
* Server certificate:
* subject: C=DE; ST=Nordrhein-Westfalen; L=Duesseldorf; O=Cumulocity GmbH; CN=*.cumulocity.com
* start date: 2016-08-01 09:55:38 GMT
* expire date: 2017-08-05 10:35:38 GMT
* subjectAltName: iot05.cumulocity.com matched
* issuer: C=US; ST=Arizona; L=Scottsdale; O=GoDaddy.com, Inc.; OU=http://certs.godaddy.com/repository/; CN=Go Daddy Secure Certificate Authority – G2
* SSL certificate verify ok.
* Server auth using Basic with user ‘yoshihara20161226’
> POST /measurement/measurements/ HTTP/1.1
> Authorization: Basic eW9zaGloYXJhMjAxNjEyMjY6QWExMjM0NTY=
> User-Agent: curl/7.38.0
> Host: iot05.cumulocity.com
> Accept: application/vnd.com.nsn.cumulocity.measurement+json; charset=UTF-8; ver=0.9
> Content-type: application/vnd.com.nsn.cumulocity.measurement+json; charset=UTF-8; ver=0.9
> Content-Length: 148
>
* upload completely sent off: 148 out of 148 bytes
< HTTP/1.1 201 Created
* Server nginx is not blacklisted
< Server: nginx
< Date: Tue, 24 Jan 2017 12:43:50 GMT
< Content-Type: application/vnd.com.nsn.cumulocity.measurement+json; charset=UTF-8; ver=0.9
< Transfer-Encoding: chunked
< Connection: keep-alive
< Location: https://iot05.cumulocity.com/measurement/measurements/31108
< Strict-Transport-Security: max-age=31536000; includeSubDomains
<
* Connection #0 to host iot05.cumulocity.com left intact
{“time”:”2017-01-24T21:43:49.023Z”,”id”:”31108″,”self”:”https://iot05.cumulocity.com/measurement/measurements/31108″,”source”:{“id”:”30909″,”self”:”https://iot05.cumulocity.com/inventory/managedObjects/30909″},”type”:”c8y_PTCMeasurement”,”c8y_TemperatureMeasurement”:{“T”:{“unit”:”C”,”value”:96}}}
最後に、周期的やらせるため、crontabを設定。
あとは様子見。。。。。
==================
*/1 * * * * sudo python 20170124_pytocum1
==================
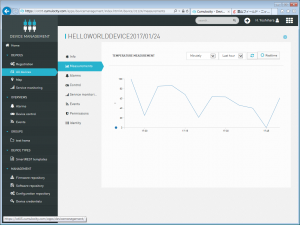
うまく出てますね!!!
ボイスSOデリバリIoTチームがんばれ!応援してます。。。。
発表会終わったら飲もう!!!
以上
